.NET Aspire Postgres Integration
Prerequisite
Goals
- (Optional) Deploy pgAdmin4 to manage postgres databases and verify .NET Aspire integration.
- Connect a .NET Aspire application to an existing postgres database.
(Optional) Deploy pgAdmin4
kubectl cnpg pgadmin4 --mode server postgres16 -n database- Easily reach the new pgAdmin4 instance by forwarding your local 8080 port using:
kubectl rollout status deployment postgres16-pgadmin4 -n database

kubectl port-forward deployment/postgres16-pgadmin4 8080:80 -n database
- Access (http://localhost:8080) via your web browser. Enter the provided username/password to login. However, accessing the server is not possible without authorizing the app user with the roles needed to login. To do this, first login to postgres as a superuser:
kubectl exec -ti -c postgres postgres16-1 -n database -- psql -U postgres
Then, run the following SQL commands to alter the “app” user and grant it the necessary attributes:
ALTER ROLE app WITH LOGIN;
ALTER ROLE app WITH PASSWORD '<password>'
It should now be possible to access the server with the app user password.
Simple Postgres Commands
Exec into one of the database pods:
λ kubectl exec -ti -c postgres postgres16-1 -n database -- psql -U postgres -d app
psql (16.6 (Debian 16.6-1.pgdg110+1))
Type "help" for help.
Create table:
CREATE TABLE my_table (
    id SERIAL PRIMARY KEY,
    name VARCHAR(100) NOT NULL,
    created_date TIMESTAMP NOT NULL DEFAULT CURRENT_TIMESTAMP,
    age INT,
    email VARCHAR(255)
);
Alter table owner (e.g. to allow for app user in pgAdmin to run queries):
ALTER TABLE my_table OWNER TO app;
Insert sample entries:
INSERT INTO my_table (name, age, email)
VALUES
('Alice', 30, '[email protected]'),
('Bob', 25, '[email protected]'),
('Charlie', 35, '[email protected]');
List tables
postgres=# \dt
          List of relations
 Schema |   Name   | Type  |  Owner
--------+----------+-------+----------
 public | my_table | table | postgres
(1 row)
View table data
postgres=# SELECT * FROM my_table;
 id |  name   |       created_date        | age |        email
----+---------+---------------------------+-----+---------------------
  1 | Alice   | 2024-12-23 21:16:07.96998 |  30 | [email protected]
  2 | Bob     | 2024-12-23 21:16:07.96998 |  25 | [email protected]
  3 | Charlie | 2024-12-23 21:16:07.96998 |  35 | [email protected]
(3 rows)
Quit
\q
Testing pgAdmin4
- Use the above commands to create a table, alter the owner, and insert sample entries into the table.
- Then, use the port-forward command to login to pgAdmin4 on
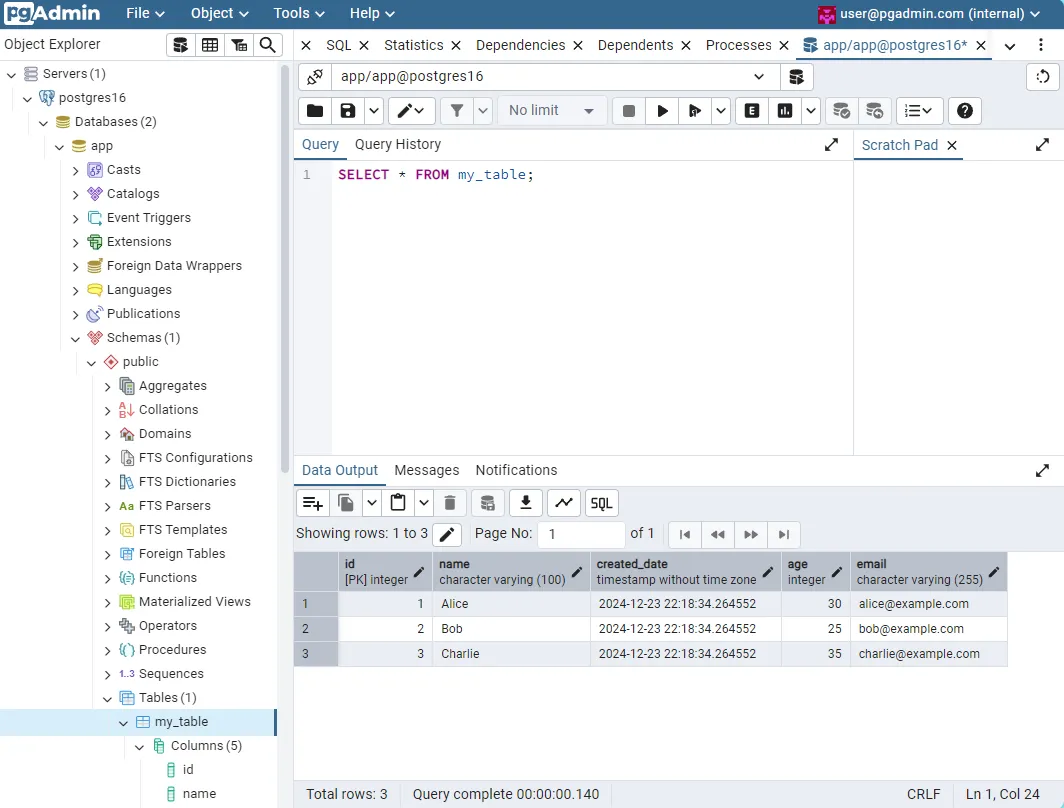
localhost:8080. - On the top bar, go to Tools > Query Tools and enter the following SQL query:
SELECT * FROM my_table;
- Press F5 or the play arrow to execute the query. If you see the sample entries as the data output, then everything is working correctly!
Connect to existing Postgres in .NET Aspire
Local Debugging
Port-forward cloudnative-pg for local debugging:
kubectl port-forward service/postgres16-rw 8080:5432 -n database
You can set breakpoints to verify the status of the database connection and to check if test queries are returning correct values.
Steps to hook up to the database:
Add connection strings to appsettings.json, both in api service and app host:
"ConnectionStrings": {
"existingPostgres":"Host=myserver;Database=mydb;Username=myuser;Password=mypassword"
}
Note: Do NOT commit the connect string to github. Use github secrets/environment variables instead. The above is for local testing only.
If testing via port-forward, myserver should be 127.0.0.1:8080. Database and Username should be app, Password can be copied in from Kubernetes > Config > Secrets > postgres16-app > password. It should be un-encoded.
(Optional) If you want to spin up local postgres containers instead of connecting to an existing postgres, follow .NET Aspire PostgreSQL integration - .NET Aspire | Microsoft Learn.
In appname.AppHost’s Program.cs file, create a resource with the connection string we defined in appsettings.json, and then reference that resource:
var existingPostgres = builder.AddConnectionString("existingPostgres");

var apiService = builder.AddProject<Projects.appname_ApiService>("appname-apiservice")
                 .WithReference(existingPostgres);
In appname.ApiService’s project files (appname.ApiService.csproj) add the Npgsql package:
  <ItemGroup>
	...other package...
	<PackageReference Include="Aspire.Npgsql" Version="9.0.0" />
  </ItemGroup>
In appname.ApiService’s Program.cs file, add the NpgsqlDataSource client connection by providing the name of the connection string.
builder.AddNpgsqlDataSource(connectionName: "existingPostgres");
In the appname.ApiService project, create a datatype for storing data retrieved from the database:
- Create the class
MyEntity.cs:
namespace appname.ApiService
{
    public class MyEntity
    {
        public int Id { get; set; }
        public string? Name { get; set; }
        public DateTime CreatedDate
        {
            get; set;
        }
    }
}
Then, create a service for connecting to the PostgreSQL database from the Npgsql client:
- Create the class
PostgresService.cs:
using Microsoft.AspNetCore.Mvc;
using Npgsql;

namespace appname.ApiService
{
    public class PostgresService(NpgsqlConnection connection)
    {
        private readonly NpgsqlConnection _connection = connection;

        public async Task<IEnumerable<MyEntity>> GetEntitiesAsync()
        {
            var result = new List<MyEntity>();
            await _connection.OpenAsync();
            using (var cmd = new NpgsqlCommand("SELECT * FROM my_table", _connection))
            using (var reader = await cmd.ExecuteReaderAsync())
            {
                while (await reader.ReadAsync())
                {
                    result.Add(new MyEntity
                    {
                        // Map your columns to your entity properties here
                        Id = reader.GetInt32(0), // Assuming 'id' is the first column
                        Name = reader.GetString(1), // Assuming 'name' is the second column
                        CreatedDate = reader.GetDateTime(2) // Assuming 'created_date' is the third column
                    });
                }
            }
            await _connection.CloseAsync();
            return result;
        }
    }

    [ApiController]
    [Route("[controller]")]
    public class PostgresController : ControllerBase
    {
        private readonly PostgresService _PostgresService;

        public PostgresController(PostgresService PostgresService)
        {
            _PostgresService = PostgresService;
        }

        [HttpGet]
        public async Task<IEnumerable<MyEntity>> Get()
        {
            return await _PostgresService.GetEntitiesAsync();
        }
    }
}
Next, let’s add the PostgresService we defined to the builder’s collection of services:
- Add a scoped service of type PostgresService to the service collection (contained within
builder.Services):
builder.Services.AddScoped<PostgresService>();
Back in Program.cs, use the service provider to create a scope and resolve PostgresService so it may be used:
using (var scope = app.Services.CreateScope())
{
    var postgresService = scope.ServiceProvider.GetRequiredService<PostgresService>();

    // Call a method from PostgresService
    var entities = await postgresService.GetEntitiesAsync();

    // Do something with the retrieved entities, e.g., log them
    foreach (var entity in entities)
    {
        Console.WriteLine($"Id: {entity.Id}, Name: {entity.Name}, CreatedDate: {entity.CreatedDate}");
    }
}
Verify Success
Given that you have port-forwarded a database pod or are running postgres locally, do the following:
- While debugging, set a breakpoint anywhere after the call to
var entities = await postgresService.GetEntitiesAsync(); - Inspect the returned entity values and compare them to the result of running
SELECT * FROM my_table; - If the id, name, and createdates match in both places, then great! Everything is working correctly.
Any missing columns will not be present since they have not been defined in the MyEntity.cs schema.
In a real application, it’s best practice to only store data that’s necessary for the app to function. In this example, even though we know the user’s age and email address, we don’t retrieve them since those fields are not defined in our schema. We could easily change this, but we don’t need that data yet since it’s not being used.
When defining a schema, it’s important to decide exactly what data should be stored and retrieved by the api service. Careful planning will make features easier to maintain and implement in the long term.
Production Notes
To have the deployed app connect to the database, we need a way to securely add the connection string without committing it directly to github. An easy way to do this is with environment variables. We’ll use the same method described in Talos Kubernetes - Deploy Metrics, Logging, and Alerts. See my deployment of my sample app for an example. In summary:
- Create a secret in BWS Manager where the value is the valid connection string. It should be in the form of
"Host=postgres16-rw.database.svc.cluster.local;Database=app;Username=app;Password=PASSWORD" - Create an
externalsecret.yamlfile that reads in the secret from BWS and creates a Kubernetes secret - Pass in the name of the Kubernetes secret to the corresponding variable in
helmrelease.yaml’s values. - Ensure the secret has been created in Kubernetes, and then deploy your application.
- Check the pod logs and ensure the connection to the database succeeded.
References
.NET Aspire PostgreSQL integration - .NET Aspire | Microsoft Learn